
Volume and Aggregate Reallocation
Summary
- Volume Reallocation: Spreads a volume across all disks in an aggregate
- Aggregate Reallocation: Optimises free space in the aggregate by ensuring free space is contiguous.
Details
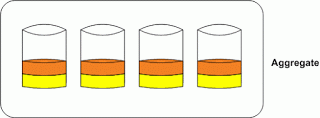
One of the most misunderstood topics I have seen with NetApp FAS systems is reallocation. There are two types of reallocation that can be run on these systems; one for files and volumes and another for aggregates. The process is run in the background, and although the goal is to optimize placement of data blocks both serve a different purpose. Below is a picture of a 4 disk aggregate with 2 volumes, one orange and one yellow.
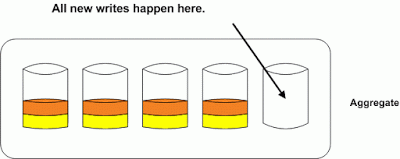
If we add a new disk to this aggregate, and we don’t run volume level reallocation all new writes will happen on the area in the aggregate that has the most contiguous free space. As we can see from the picture below this area is the new disk. Since new data is usually the most accessed data you now have this single disk servicing most of your reads and writes. This will create a “hot disk”, and performance issues.
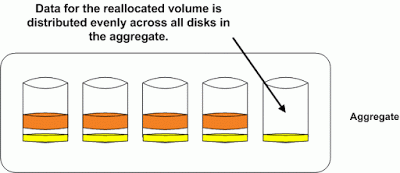
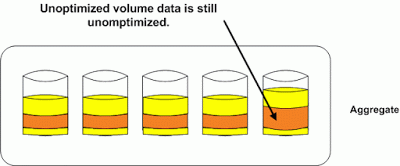
Now if we run a volume reallocation on the yellow volume the data will be spread out across all the disks in the aggregate. The orange volume is still unoptimized and will suffer from the hot disk syndrome until we run a reallocation on it as well.
This is why when adding only a few new disk to an aggregate you must run a volume reallocation against every volume in your aggregate. If you are adding multiple disks to an aggregate (16, 32, etc) it may not be necessary to run the reallocate. Imagine you add 32 disk to a 16 disk aggregate. New writes will go to 32 disk instead of the 16 you had prior so performance will be much better without taking any intervention. As the new disk begin to fill up writes will eventually hit all 48 disks in your aggregate. You could of course speed this process up by running manual reallocation against all volumes in the aggregate.
The other big area of confusion is what an aggregate reallocation actually does. Aggregate reallocation “reallocate -A” will only optimize free space in the aggregate. This will help your system with writes as the easier it is to find contiguous free space the more efficient those operations will be. Take the diagram below as an example of an aggregate that could benefit from reallocation.
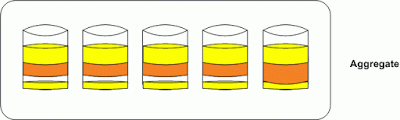
This is our expanded aggregate that we only reallocated the yellow volume. We see free space in the aggregate where the blocks were distributed across the other disk. We also see how new writes for the orange volume stacked up on the new disk as that is where we had the most contiguous free space. I wonder if the application owner has been complaining about performance issues with his orange data? The picture below shows us what happens after the aggregate reallocate.
We still have the unoptimized data from the volume we did not reallocate. The only thing the aggregate reallocate did was make the free space in it more contiguous for writing new data. It is easy to see how one could be confused by these similar but different processes, and I hope this helps explain how and why you would use the different types of reallocation.
Zeroing & Sanitising Disks
Information
- Reference: Spares FAQ
If a disk has been moved around, or previously had data on it, you’ll need to zero it before it can be re-used. The “disk zero spares” command does the job, depending on the size of the disk will depend on how long it takes, usually no more than 4 hours even for the largest of disks (at time of writing, 1TB disks).
More Information
- Reference: How to securely erase your data on a NetApp
When drives in a NetApp are being obsoleted and replaced we need to make sure we securely erase all data that used to be on them. Unless you’re just going to crush your disks.
In this example we’ve got an aggregate of 14 disks (aggr0) that need to be wiped and removed from our NetApp so they can be replaced with new, much larger disks.
There are two methods that you can use to wipe disks using your NetApp. The first is to simply delete the aggregate they are a member of, turning them into spares and then running “disk zero spares” from the command line on your NetApp. This only does a single pass and only zero’s the disks. There are arguments I’ve seen where some people say this is enough. I honestly don’t know and we have a requirement to do a 7 pass wipe in our enterprise. You could run the zero command 7 times but I don’t imagine that would be as effective as option number two. The second option is to run the ‘disk sanitize’ command which allows you to specify which disks you want to erase and how many passes to perform. This is what we’re going to use.
The first thing you’ll need to do is get a license for your NetApp to enable the ‘disk sanitize’. It’s a free license (so I’ve been told) and you can contact your sales rep to get one. We got ours for free and I’ve seen forum posts from other NetApp owners saying the same thing.
There is a downside to installing the disk sanitization license. Once it’s installed on a NetApp it cannot be removed. It also restricts the use of three commands once installed:
- dd (to copy blocks of data)
- dumpblock (to print dumps of disk blocks)
- setflag wafl_metadata_visible (to allow access to internal WAFL files)
There are also a few limitations regarding disk sanitization you should know about:
- It is not supported in takeover mode for systems in an HA configuration. (If a storage system is disabled, it remains disabled during the disk sanitization process.)
- It cannot be carried out on disks that were failed due to readability or writability problems.
- It does not perform its formatting phase on ATA drives.
- If you are using the random pattern, it cannot be performed on more than 100 disks at one time.
- It is not supported on array LUNs.
- It is not supported on SSDs.
- If you sanitize both SES disks in the same ESH shelf at the same time, you see errors on the console about access to that shelf, and shelf warnings are not reported for the duration of the sanitization. However, data access to that shelf is not interrupted.
I’ve also read that you shouldn’t sanitize more then 6 disks at once. I’m going to sanitize our disks in batches of 5, 5 and 4 (14 total). I’ve also read you do not want to sanitize disks across shelves at the same time.
Fractional Reserve
Information on Fractional Reserve:
- http://alethiakaiepisto.blogspot.com.au/2011/08/volume-fractional-reserve-vs-snap.html
- http://blog.hernanjlarrea.com.ar/index.php/what-is-fractional-reserve-option/
- http://www.linkedin.com/groups/hi-All-What-is-fractional-93470.S.155142981
- https://library.netapp.com/ecmdocs/ECMP1196995/html/GUID-596042AF-8E9C-4187-969C-633DFDD5A936.html
- https://niktips.wordpress.com/tag/fractional-reserve/
- https://library.netapp.com/ecmdocs/ECMP1196995/html/GUID-AA594113-8BA8-48BC-8982-928CA4B93B11.html
As per the following links, Fractional Reserve should be disabled for LUNs:
- https://niktips.wordpress.com/2013/05/22/netapp-thin-provisioning-for-vmware-luns/
- https://niktips.wordpress.com/2012/03/15/netapp-thin-provisioning-for-vmware/
Other Posts in this Series
See the NetApp From the Ground Up - A Beginner’s Guide - Index post for links to all of the posts in this series.
As always, if you have any questions or have a topic that you would like me to discuss, please feel free to post a comment at the bottom of this blog entry, e-mail at will@oznetnerd.com, or drop me a message on Reddit (OzNetNerd).
Note: The opinions expressed in this blog are my own and not those of my employer.

Leave a comment