
Picking up where I left off in Part 1 of this series, let’s continue our exploration of ZExplore :)
Mandatory Parameters
In part 1 I touched on the fact that the API documentation can be a little confusing when it comes to mandatory fields. Unfortunately the same is true for ZExplore. However, NetApp’s documentation explains it well:
Red colored arrows indicate mandatory parameters whereas Blue colored arrows indicate optional parameters.
Note: In some APIs when either one of the two input parameters is required, both these input parameters are marked by “Blue” color arrow and not “Red”.
As I mentioned in my previous post, by doing this NetApp avoids confusing users who might otherwise try to set both parameters if they were both marked as required.
XML Configuration
The API’s entries are listed on the left hand side and are laid out in a hierarchical fashion, similar to that of a directory structure. To use it you must first find the “directory” you’re interested in using and then you expand it by clicking the ”+”. Next you select the entry you want, right click on it and then click “Generate”.
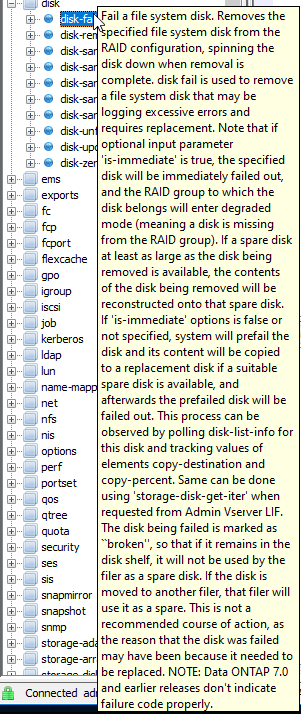
If you’d like more information on an entry, you can either read the documentation or hover your mouse over the entry in ZExplore. The image below is an example of the information that is presented when an entry is hovered over.
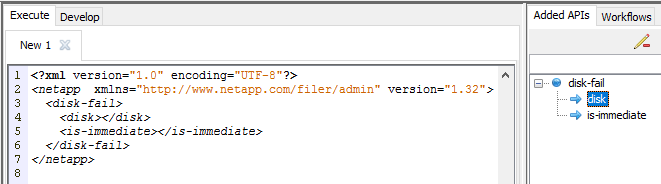
Clicking “Generate” adds the XML code to the “Execute” pane. The entry is also added to the “Added APIs” pane:
Next you need to fill in the required fields. You can do that by:
- Editing the XML code directly in the “Execute” pane.
- Right clicking on the parameters in the “Added APIs” pane and then clicking “Edit”.
My preference is the former as I find it quicker but the latter is perfectly fine too.
The great news is that as you add more entries, the “Added APIs” pane and the XML code are updated automatically. This is a massive time saver as you don’t have to worry about ensuring your XML hierarchy is set up correctly - ZExplore does that for you.
Show Commands/Calls
There are two important things to note when dealing with show commands through the API. The first is that they’re actually referred to as get API calls. This isn’t a big deal but is worth mentioning in case you were looking for show entries/documentation.
The second is that the structure of the get calls differs from the set calls. In the previous screenshot we saw that the disk-fail entry has a flat hierarchy. It has simply has two components under the root and that’s it. get calls on the other hand have a much deeper hierarchy:

Thankfully they’re actually very easy to work with. The hierarchy is broken down into three main categories:
- desired-attributes : The information you’d like to retrieve.
- max-records : The maximum number of records you’d like to receive.
- query : Filters you’d like to apply to your call.
For example, let’s say I’d like achieve the following:
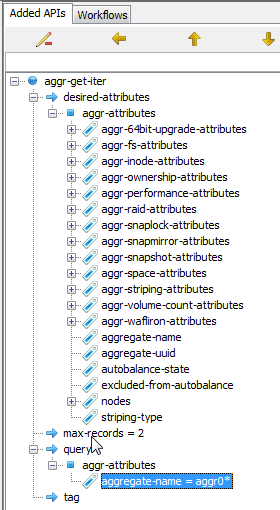
- Retrieve all information aggr-get-iter has to offer.
- Limit the amount of records that are retrieved to 2.
- The aggregate names must begin with “aggr0”.
To achieve this I simply need to do the following:
- “Generate” aggr-get-iter and leave the desired-attributes as is. Doing so will ensure all attributes are retrieved.
- Set max-records to 2.
- Delete all aggr-attributes except for aggregate-name . Set this parameter to aggr0*
Note: The last step is extremely important. As mentioned above, the aggr-attributes_entries are filters. Unless your query results meet all attribute entries, they will not be returned. Therefore I advise you to remove all attributes which you do set a value for._
Once you’ve done this, your settings should look like this:
Next I click the “Play” button to run my query. If all goes well I should receive just over 200 lines of XML code, which I do. As most of the output isn’t relevant for this post, I’ve only provided the interesting parts below:
<?xml version='1.0' encoding='UTF-8' ?>
<netapp version='1.32' xmlns='http://www.netapp.com/filer/admin'>

    <!-- Output of aggr-get-iter [Execution Time: 47 ms] -->
	<results status='passed'>


<!! OMITTED !!>


		<num-records>2</num-records>

	</results>
</netapp>
The first highlighted line tells us that our query was run successfully, while the second highlighted line tells us how many records were returned. If our query failed (e.g we did not provide a mandatory parameter) the “results” status would contain an error message as opposed to the word “passed”.
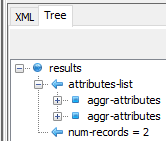
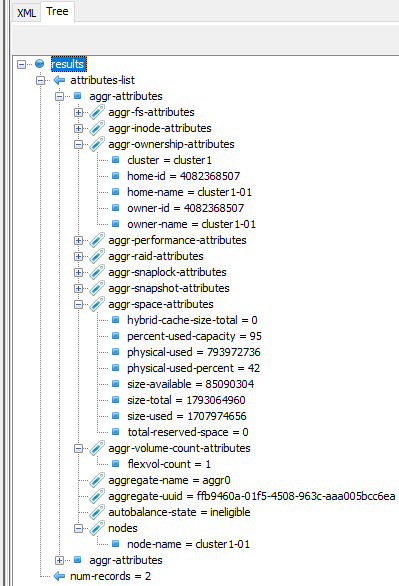
Now because no one in their right minds would want to sift through over 200 lines of XML, XExplore has a nice “Tree” feature that allows you to browse the results in a hierarchical fashion. In the image below we can see the two aggr-attributes records which were returned:
Drilling down the hierarchy shows us the actual values which were collected as specified by the desired-attributes entries, as shown below:
And there we have it! We’ve completed our first API call.
Continue onto Part 3
In Part 3 of this series I demonstrate how to use ZExplore to convert XML queries to languages including Python, Perl, Ruby, just to name a few. I also explain why you should only specify the desired-attributes which you intend to use.
As always, if you have any questions or have a topic that you would like me to discuss, please feel free to post a comment at the bottom of this blog entry, e-mail at will@oznetnerd.com, or drop me a message on Reddit (OzNetNerd).
Note: The opinions expressed in this blog are my own and not those of my employer.

Leave a comment