
I have written a few pieces on making the most out of your virtual and physical labs. These include:
- Connecting Your PC to Your Virtual GNS3 Routers
- Virtual Equipment + Physical Equipment = Big Lab
- Guide: Building a Self-Contained Virtual Steelhead Lab
- And my Ultimate Cisco Lab website
Today I’m going to cover how you can add another piece of virtual equipment to your lab - the NetApp Simulator.
Note: As there are plenty of NetApp Simulator documents, blog posts and forum discussions, I won’t be covering things like licence keys, initial configuration, etc.
Overview
As with my previous guides, GNS3’s “cloud” object is used to enable the simulator to connect to the rest of the lab virtual and physical lab. For those who are unfamiliar with the cloud object, it allows you to bind your network adapters (both physical and virtual) to an object inside of your GNS3 topology. This object can then be connected to your GNS3 equipment and/or other clouds, enabling the devices to communicate with one another.
As demonstrated in this guide, by binding the NetApp simulator’s ports to a cloud we’re able to get the simulator to communicate with a Cisco router. The router could easily be replaced with or used in conjunction with any other piece of equipment, whether it be a Virtual Steelhead, Palo Alto firewall, F5 load balancer, ASA firewall, PC, etc. The possibilities are endless.
NetApp Network Ports
At the time of writing the simulator (CDoT 8.2) has four network ports:
- e0a:
- Port Type: Cluster
- LIF Type: Cluster
- e0b:
- Port Type: Cluster
- LIF Type: Cluster
- e0c:
- Port Type: Data
- LIF Types: Node Management & Cluster Management
- e0d:
- Port Type: Data
- LIF Type: None
The above information can be found in the output of the following commands:
cdot-clust::> network port show
                                      Auto-Negot  Duplex     Speed (Mbps)
Node   Port   Role         Link   MTU Admin/Oper  Admin/Oper Admin/Oper
------ ------ ------------ ---- ----- ----------- ---------- ------------
cdot-clust-01
       e0a    cluster      up    1500  true/true  full/full   auto/1000
       e0b    cluster      up    1500  true/true  full/full   auto/1000
       e0c    data         up    1500  true/true  full/full   auto/1000
       e0d    data         up    1500  true/true  full/full   auto/1000
cdot-clust-02
       e0a    cluster      up    1500  true/true  full/full   auto/1000
       e0b    cluster      up    1500  true/true  full/full   auto/1000
       e0c    data         up    1500  true/true  full/full   auto/1000
       e0d    data         up    1500  true/true  full/full   auto/1000

8 entries were displayed.
cdot-clust::> network interface show
            Logical    Status     Network            Current       Current Is
Vserver     Interface  Admin/Oper Address/Mask       Node          Port    Home
----------- ---------- ---------- ------------------ ------------- ------- ----
cdot-clust
            cluster_mgmt up/up    10.0.0.7/24        cdot-clust-01 e0c     true
cdot-clust-01
            clus1        up/up    169.254.237.84/16  cdot-clust-01 e0a     true
            clus2        up/up    169.254.116.159/16 cdot-clust-01 e0b     true
            mgmt1        up/up    10.0.0.8/24        cdot-clust-01 e0c     true
cdot-clust-02
            clus1        up/up    169.254.246.226/16 cdot-clust-02 e0a     true
            clus2        up/up    169.254.77.253/16  cdot-clust-02 e0b     true
            mgmt1        up/up    10.0.0.9/24        cdot-clust-02 e0c     true

7 entries were displayed.
As per the above outputs, we need a minimum of three subnets:
- Cluster
- Management
- Storage
For this example I chose to use 169.254.0.0/16 for cluster traffic, 10.0.0.0/24 for management traffic and 10.0.1.0/24 for storage traffic (which has not been configured at this stage).
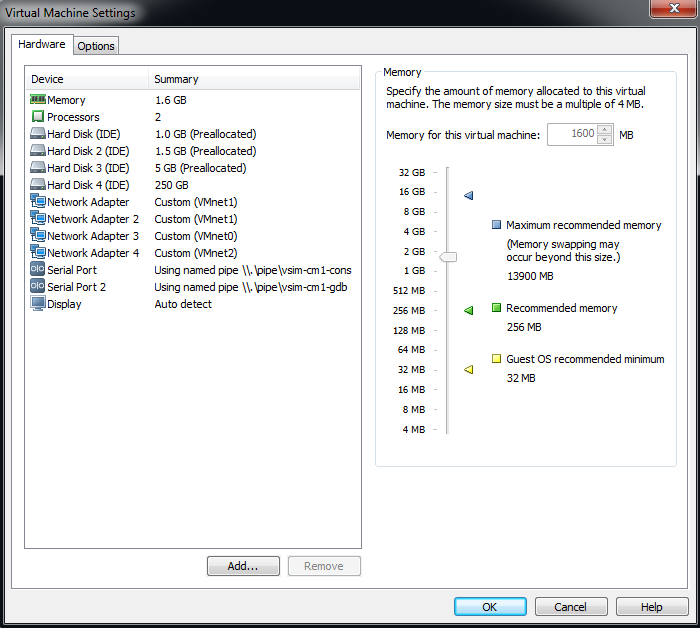
Port Mappings
Now that we’ve got an understanding of the simulator’s ports as well as the subnets we’ll be using, it’s time to map these ports to our VMWare Workstation adapters. Doing so enables us to segment off the ports into their functional groups. For example, e0a and e0b should have an adapter which is dedicated to cluster traffic, e0c should have an adapter which is dedicated to management traffic and e0d should have an adapter which is dedicated to storage traffic.
Note: While this setup would work even if we bound all of the simulator’s ports to a single Workstation VMnet interface, it is better practice to segment them off into their functional groups as it replicates what is seen in production environments.
Below is the way in which I’ll set up the mappings:
- e0a & e0b - VMnet1 (169.254.0.0/16)
- e0c - VMnet0 (10.0.0/24)
- e0d - VMnet2 (10.0.1.0/24)
By using this mapping we avoid having all three subnets sharing a single VMnet interface. Instead each subnet has its own discreet port.
But wait, given that the Workstation network interfaces all have generic “Network Adapter” names (as per the screenshot below), how do we know which simulator port each of them are bound to?
Well, from my testing it appears as though they’re bound alphabetically:
- Network Adapter - e0a
- Network Adapter 2 - e0b
- Network Adapter 3 - e0c
- Network Adapter 4 - e0d
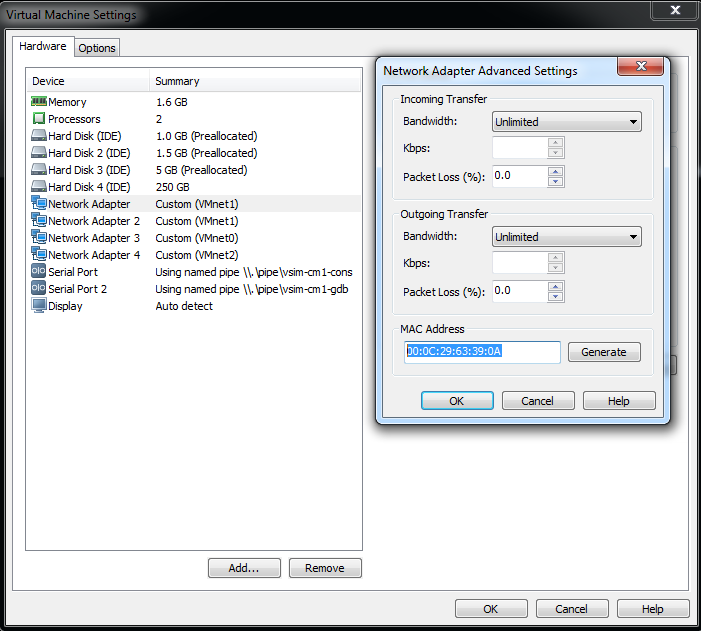
However, you don’t have to take my word for it. Let’s confirm it, just to be sure. Issue the following command:
cdot-clust::> network port show -fields mac
node          port mac
------------- ---- -----------------
cdot-clust-01 e0a  00:0c:29:63:39:0a
cdot-clust-01 e0b  00:0c:29:63:39:14
cdot-clust-01 e0c  00:0c:29:63:39:1e
cdot-clust-01 e0d  00:0c:29:63:39:28
cdot-clust-02 e0a  00:0c:29:33:2b:84
cdot-clust-02 e0b  00:0c:29:33:2b:8e
cdot-clust-02 e0c  00:0c:29:33:2b:98
cdot-clust-02 e0d  00:0c:29:33:2b:a2

8 entries were displayed.
Then in Workstation, select a Network Adapter and click “Advanced…”. Now look at the “MAC Address” field and then marry up the MAC there to the output from the command used above. As per the screenshot below, we can confirm that “Network Adapter” maps to e0a:
VMnet Configuration
In order to connect your VMnet interfaces to GNS3, you must use Workstation’s “Connect a host virtual adapter to this network”:
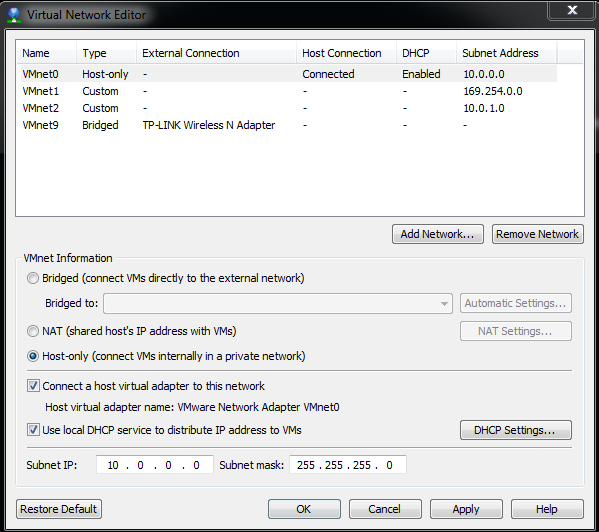
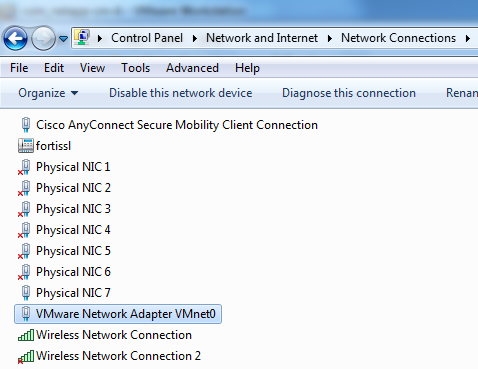
Doing this results in a new network adapter appearing in your network adapter list, as per the image below. It is this adapter which you will bind to the cloud object in GNS3 which will enable your GNS3 devices to communicate with your simulator.
As I’m using VMnet0 for this example, my GNS3 topology will have access to my management (10.0.0.0/24) subnet. Further to this, as I’ve enabled the “Use local DHCP service to distribute IP address to VMs” option, the newly created adapter will receive an IP address on the management subnet. This will allow me to use SecureCRT to SSH into the cluster, so I no longer have to use Workstation’s console.
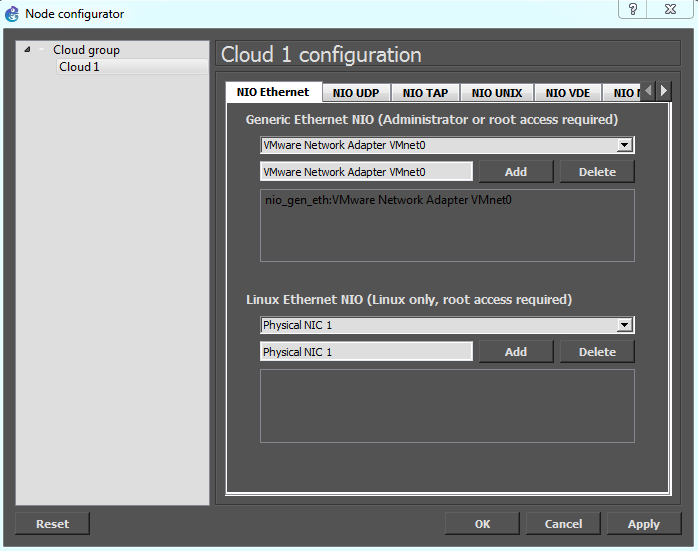
GNS3 Connectivity
We’re almost there! Only a couple of steps to go. Hang in there :)
Drag a router and a cloud into the topology pane, and then bind the “VMware Network Adapter VMnet0” adapter to the cloud:
Next, connect the router and cloud together, and then fire up the topology:

Finally, configure the router with an IP address on the management subnet and you’re done:
R1#conf t
Enter configuration commands, one per line.  End with CNTL/Z.
R1(config)#int f0/0
R1(config-if)#no shut
R1(config-if)#ip add 10.0.0.1
*Mar  1 00:02:03.659: %LINK-3-UPDOWN: Interface FastEthernet0/0, changed state to up
*Mar  1 00:02:04.659: %LINEPROTO-5-UPDOWN: Line protocol on Interface FastEthernet0/0, changed state to up
R1(config-if)#ip add 10.0.0.1 255.255.255.0
To confirm that the setup is working correctly, let’s run a ping test:
R1(config-if)#do ping 10.0.0.7

Type escape sequence to abort.
Sending 5, 100-byte ICMP Echos to 10.0.0.7, timeout is 2 seconds:
!!!!!
Success rate is 100 percent (5/5), round-trip min/avg/max = 8/211/1016 ms
Finally, to test all seven layers of the OSI model, let’s SSH to the simulator from the router:
R1(config-if)#do ssh -l admin 10.0.0.7

Password:
cdot-clust::>
And there you have it! Full connectivity between the simulator and GNS3. As mentioned above, you can easily replace the router with any other device, whether it be physical or virtual.
Update: See the Trunking VLANs between the NetApp Simulator and GNS3 post for more information on integrating the NetApp simulator with GNS3.
As always, if you have any questions or have a topic that you would like me to discuss, please feel free to post a comment at the bottom of this blog entry, e-mail at will@oznetnerd.com, or drop me a message on Reddit (OzNetNerd).
Note: The opinions expressed in this blog are my own and not those of my employer.

Leave a comment