In my previous post I touched on the basics of how you can use pytest to test your code. In this post I’ll be covering how you can use Allure2 to prettify your pytest results.
Allure2 Adapter for pytest
The first thing we need to is install the Allure adapter for Pytest. As the documentation states, this repository contains a plugin for py.test which automatically prepares input data used to generate Allure Report.
Issue the following command to install the adapter:
sudo pip install allure-pytest
Download Allure2
Next we need to head over to the Allure2 documentation. There are multiple installation options. As I don’t use linuxbrew, I opted for the manual installation method.
In order to do a manual installation, we’ll need to download the tar file from bintray and untar it:
will@ubuntu:~$ cd /tmp
will@ubuntu:/tmp$ wget https://bintray.com/qameta/generic/download_file?file_path=io%2Fqameta%2Fallure%2Fallure%2F2.3.3%2Fallure-2.3.3.tgz
will@ubuntu:/tmp$ tar xvf download_file\?file_path\=io%2Fqameta%2Fallure%2Fallure%2F2.3.3%2Fallure-2.3.3.tgz
Next we move Allure2 to the /usr/bin directory.
will@ubuntu:/tmp$ mv allure-2.3.3/ /usr/bin/allure
will@ubuntu:~$ cd /usr/bin/allure/
will@ubuntu:/usr/bin/allure$ ls
bin config lib plugins
We then add the path to the Allure2 binary to my PATH:
will@ubuntu:/usr/src/allure$ nano ~/.pam_environment
PATH DEFAULT=${PATH}:/usr/bin/allure/bin
Finally, we’ll need to open a new SSH session to our Linux box.
Note: This step is very important and is required in order to take advantage of the new PATH entry. See the Ubuntu documentation for more information.
Download Java
You should now be able to access Allure2. However, if you don’t have Java installed you’ll need to do that now:
will@ubuntu:~$ allure

ERROR: JAVA_HOME is not set and no 'java' command could be found in your PATH.

Please set the JAVA_HOME variable in your environment to match the
location of your Java installation.

will@ubuntu:~$ sudo apt-get install default-jre
Once the installation is finished, you should be able to run Allure2 without issue:
will@ubuntu:~$ allure
Usage: allure [options] [command] [command options]
  Options:
    --help
      Print commandline help.
    -q, --quiet
      Switch on the quiet mode.
      Default: false
    -v, --verbose
      Switch on the verbose mode.
      Default: false
    --version
      Print commandline version.
      Default: false
  Commands:
    generate      Generate the report
      Usage: generate [options] The directories with allure results
        Options:
          -c, --clean
            Clean Allure report directory before generating a new one.
            Default: false
          --config
            Allure commandline config path. If specified overrides values from
            --profile and --configDirectory.
          --configDirectory
            Allure commandline configurations directory. By default uses
            ALLURE_HOME directory.
          --profile
            Allure commandline configuration profile.
          -o, --report-dir, --output
            The directory to generate Allure report into.
            Default: allure-report

    serve      Serve the report
      Usage: serve [options] The directories with allure results
        Options:
          --config
            Allure commandline config path. If specified overrides values from
            --profile and --configDirectory.
          --configDirectory
            Allure commandline configurations directory. By default uses
            ALLURE_HOME directory.
          -p, --port
            This port will be used to start web server for the report.
            Default: 0
          --profile
            Allure commandline configuration profile.

    open      Open generated report
      Usage: open [options] The report directory
        Options:
          -p, --port
            This port will be used to start web server for the report.
            Default: 0

    plugin      Generate the report
      Usage: plugin [options]
        Options:
          --config
            Allure commandline config path. If specified overrides values from
            --profile and --configDirectory.
          --configDirectory
            Allure commandline configurations directory. By default uses
            ALLURE_HOME directory.
          --profile
            Allure commandline configuration profile.
Basic Test
To see Allure2 in action, you’ll need to create a test script or scripts. As I was writing scripts for the purpose of this post, I put mine in a temporary directory:
will@ubuntu:~$ mkdir test_scripts
will@ubuntu:~$ cd test_scripts/
nano test_script1.py
The contents of test_script1.py is as follows:
def f():
    return 3

def test_function_f():
    assert f() == 4

def p():
    return 4

def test_function_p():
    assert p() == 4
I’ve intentionally created one test which will pass and one that will fail. Let’s now run pytest along with the Allure adapter we installed at the beginning of this post:
will@ubuntu:~/test_scripts$ sudo py.test --alluredir test_script_results
[sudo] password for will:
======================================================= test session starts ========================================================
platform linux2 -- Python 2.7.12, pytest-3.2.1, py-1.4.34, pluggy-0.4.0
rootdir: /home/will/test_scripts, inifile:
plugins: allure-pytest-2.2.1b1
collected 2 items

test_script1.py F.

============================================================= FAILURES =============================================================
_________________________________________________________ test_function_f __________________________________________________________

    def test_function_f():
>       assert f() == 4
E       assert 3 == 4
E        +  where 3 = f()

test_script1.py:5: AssertionError
================================================ 1 failed, 1 passed in 0.03 seconds ===============================================
To ensure that our adapter worked, let’s take a look at the outputs it produced:
will@ubuntu:~/test_scripts$ ls test_script_results/
115ccfe6-6f0e-42d3-8cfb-2e8b2b4de9b0-result.json  9db27510-a607-4b60-acf2-09449ee192b2-result.json

will@ubuntu:~/test_scripts/test_script_results$ cat 115ccfe6-6f0e-42d3-8cfb-2e8b2b4de9b0-result.json
{"status": "failed", "uuid": "50ccf8cb-05d4-46cf-a549-dec2637d7e2c", "labels": [{"name": "package", "value": "test_script1"}], "stop": 1502601597611, "historyId": "d89c4c531748461cd6122faa9195403a", "start": 1502601597610, "fullName": "test_script1#test_function_f", "statusDetails": {"message": "AssertionError: assert 3 == 4
+  where 3 = f()", "trace": "def test_function_f():
>       assert f() == 4
E       assert 3 == 4
E        +  where 3 = f()

test_script1.py:5: AssertionError"}, "name": "test_function_f"}
Excellent, we see that it’s created a couple of JSON files which contain the results of our test. Let’s now create an Allure2 report:
will@ubuntu:~/test_scripts$ sudo env "PATH=$PATH" allure generate test_script_results/ -o ./allure_report
Report successfully generated to ./allure_report
Now let’s check that our report was generated correctly:
will@ubuntu:~/test_scripts$ tree ./allure_report
./allure_report
├── app.js
├── data
│   ├── attachments
│   ├── behaviors.json
│   ├── categories.json
│   ├── graph.json
│   ├── packages.json
│   ├── suites.json
│   ├── test-cases
│   │   ├── 2cba2dbed7e78163.json
│   │   └── cc088a964cf49485.json
│   ├── timeline.json
│   └── widgets.json
├── export
│   ├── mail.html
│   └── summary.json
├── favicon.ico
├── history
│   ├── history.json
│   └── history-trend.json
├── index.html
├── plugins
│   ├── behaviors
│   │   └── index.js
│   ├── junit
│   ├── packages
│   │   └── index.js
│   ├── screen-diff
│   │   ├── index.js
│   │   └── styles.css
│   ├── trx
│   └── xunit-xml
└── styles.css

12 directories, 21 files
Great, that looks good to me. Let’s now look at the actual report. To do this, we’ll need to navigate to the index.html file and open it.
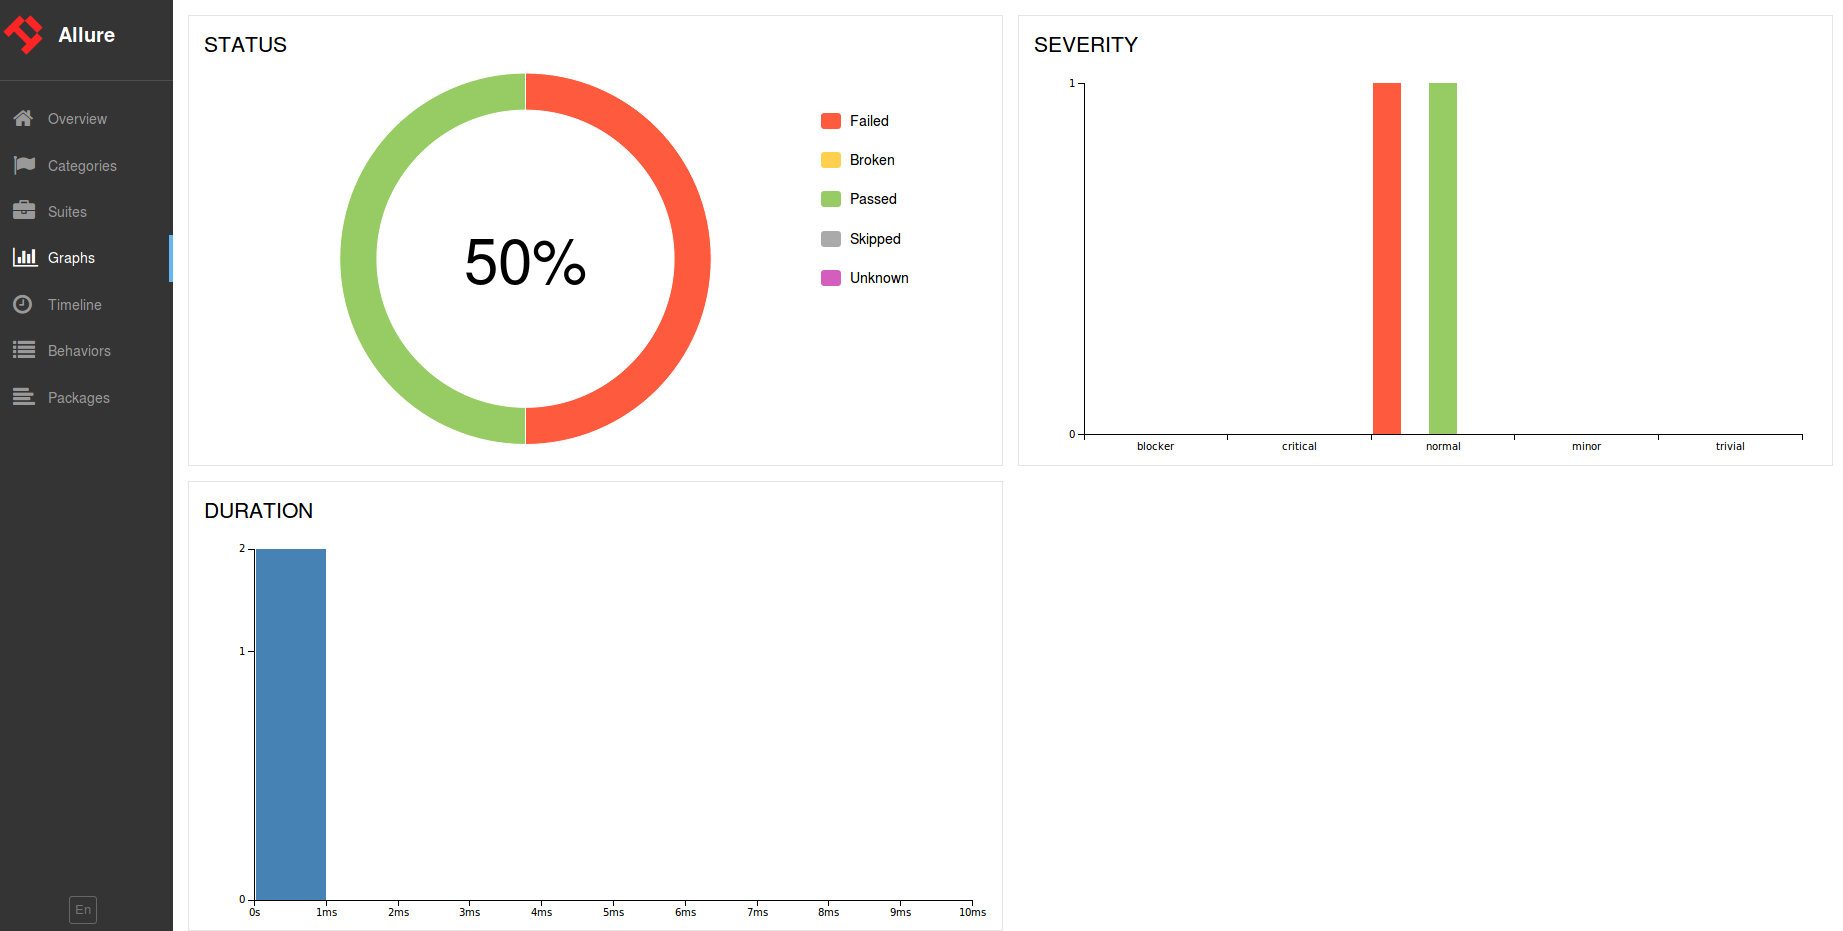
Allure2 GUI
Opening the index.html file will give you a full report of what worked, and what didn’t. The example screenshot below shows the “Graphs” page. For a full, interactive demo, please see the Allure2 demo page.
As always, if you have any questions or have a topic that you would like me to discuss, please feel free to post a comment at the bottom of this blog entry, e-mail at will@oznetnerd.com, or drop me a message on Reddit (OzNetNerd).
Note: The opinions expressed in this blog are my own and not those of my employer.