
In the previous post, Choosing a configuration method, we looked at the three ways in which a Kubernetes cluster can be configured. In this post we’ll go through the components which make up the cluster.
Kubernetes clusters have two types of servers: masters and nodes. The masters provide the control plane for the cluster while the nodes take care of the workloads. As you probably guessed, having one or more of either provides high availability.
The components documentation gives us a great rundown on the components that make up each of these two nodes, though it might be a little confusing for those who are just starting out. In this post we’ll look through each component’s documentation while adding additional information as required. Furthermore, to help really get the point across, we’ll build a diagram to show where each component resides.
kubectl
Before covering the master’s and node’s components though, it’s worth covering kubectl first. From the kubectl documentation:
Use the Kubernetes command-line tool, kubectl, to deploy and manage applications on Kubernetes. Using kubectl, you can inspect cluster resources; create, delete, and update components; and look at your new cluster and bring up example apps.
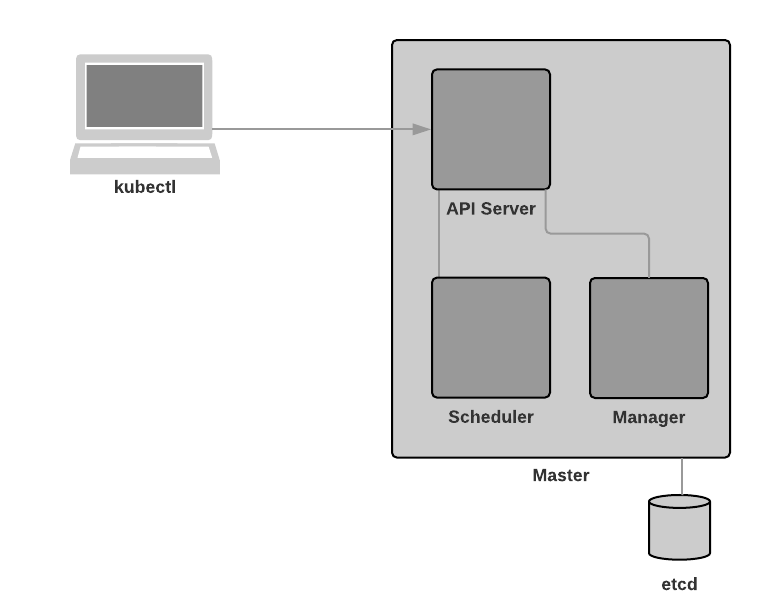
OK great, kubectl is used to administer our Kubernetes cluster. Let’s see what that looks like: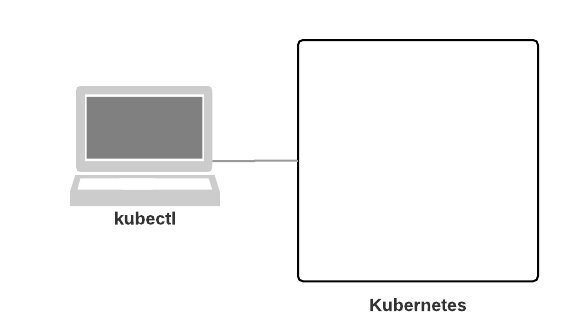
Master Components
Master components provide the cluster’s control plane. Master components make global decisions about the cluster (for example, scheduling), and detecting and responding to cluster events (starting up a new pod when a replication controller’s ‘replicas’ field is unsatisfied).
This is what we’d expect from the role which provides the control plane, but it’s useful information nevertheless.
kube-apiserver
Component on the master that exposes the Kubernetes API. It is the front-end for the Kubernetes control plane.
It is designed to scale horizontally – that is, it scales by deploying more instances.
kube-apiserver is the front door to our Kubernetes cluster. As it is horizontally scalable, it enables us to have multiple masters in our cluster.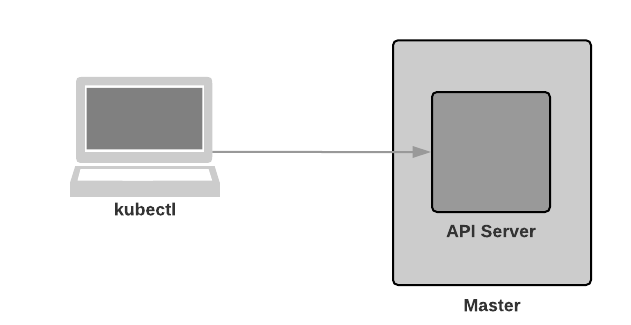
etcd
Consistent and highly-available key value store used as Kubernetes’ backing store for all cluster data.
Always have a backup plan for etcd’s data for your Kubernetes cluster.
This one is self explanatory - Kubernetes uses etcd to store cluster data. Note that as per the diagram below, the database is stored outside of the cluster.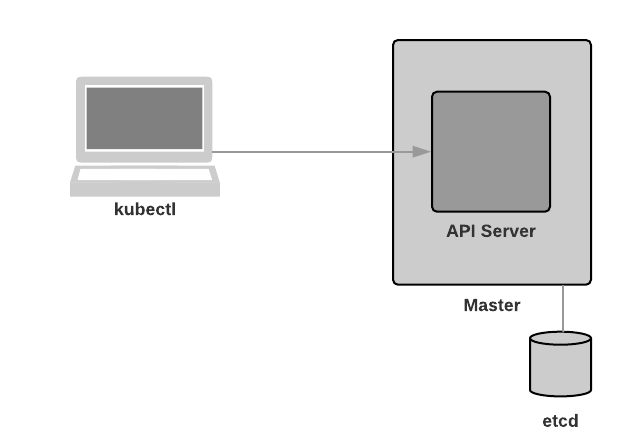
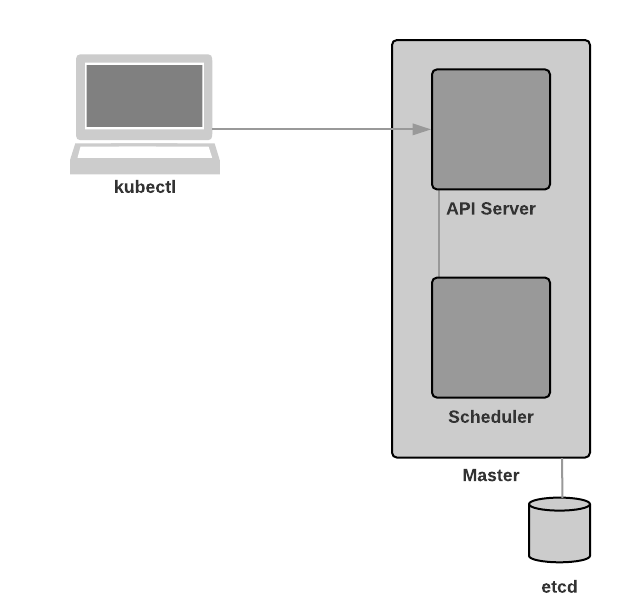
kube-scheduler
Component on the master that watches newly created pods that have no node assigned, and selects a node for them to run on.
Factors taken into account for scheduling decisions include individual and collective resource requirements, hardware/software/policy constraints, affinity and anti-affinity specifications, data locality, inter-workload interference and deadlines.
OK, this one introduces a few terms we haven’t yet covered, so let’s touch on them now and delve deeper into them in a subsequent post.
- Pods: For now, think of them as containers
- Scheduling: When configuring pods, e.g using
kubectl, we can define policies which must be met by Nodes in order for them to be eligible to host the pods. For example, pod A requires x amount of CPU, y amount of RAM, but cannot be on the same node as pod B. Once the eligible host(s) have been located, the master(s) will schedule (i.e spin them up) on one or more of these nodes
kube-controller-manager
Component on the master that runs controllers. (Controllers are a control loop that watches the shared state of the cluster through the apiserver and makes changes attempting to move the current state towards the desired state.)
Logically, each controller is a separate process, but to reduce complexity, they are all compiled into a single binary and run in a single process.
These controllers include:
- Node Controller: Responsible for noticing and responding when nodes go down.
- Replication Controller: Responsible for maintaining the correct number of pods for every replication controller object in the system.
- Endpoints Controller: Populates the Endpoints object (that is, joins Services & Pods).
- Service Account & Token Controllers: Create default accounts and API access tokens for new namespaces
In a nutshell, we use kubectl to configure our Kubernetes cluster. The kubectl commands we run hit our kube-apiserver. Our kube-controller-manager watches the API server for changes and does what is required in order to fulfill them.
Note: We’ll delve into replication, endpoints, accounts and tokens later on in this series.
cloud-controller-manager
cloud-controller-manager runs controllers that interact with the underlying cloud providers. The cloud-controller-manager binary is an alpha feature introduced in Kubernetes release 1.6.
cloud-controller-manager runs cloud-provider-specific controller loops only. You must disable these controller loops in the kube-controller-manager. You can disable the controller loops by setting the
--cloud-providerflag toexternalwhen starting the kube-controller-manager.cloud-controller-manager allows cloud vendors code and the Kubernetes core to evolve independent of each other. In prior releases, the core Kubernetes code was dependent upon cloud-provider-specific code for functionality. In future releases, code specific to cloud vendors should be maintained by the cloud vendor themselves, and linked to cloud-controller-manager while running Kubernetes.
The following controllers have cloud provider dependencies:
- Node Controller: For checking the cloud provider to determine if a node has been deleted in the cloud after it stops responding
- Route Controller: For setting up routes in the underlying cloud infrastructure
- Service Controller: For creating, updating and deleting cloud provider load balancers
- Volume Controller: For creating, attaching, and mounting volumes, and interacting with the cloud provider to orchestrate volumes
The first sentence of the above quote sums up the cloud-controller-manager perfectly - “cloud-controller-manager runs controllers that interact with the underlying cloud providers.” This is of course useful for those who want to run Kubernetes in the cloud. For those who do not though, the kube-controller-manager is the only controller you’ll need.
More information on the Cloud Controller can be found here.
Master Recap
That brings us to the end of the master components. Before we move onto the node components, let’s quickly recap what we’ve just learned:
- We use
kubectlon our machines to interact with the master(s) of our Kubernetes cluster - Our
kubectlcommands hit the API server on one of our masters - The kube-scheduler watches the API server for new pod calls. Upon seeing them, it schedules the pods onto nodes
- The kube-controller-manager is a collection of controllers responsible for monitoring node health, replication compliance, endpoints, accounts and tokens
- The cloud-controller-manager is used when we’re deploying Kubernetes in the cloud. We disable the kube-controller-manager functions which overlap to ensure the cloud flavour is used instead
Node Components
Node components run on every node, maintaining running pods and providing the Kubernetes runtime environment.
There’s nothing more to add to that really.
Container Runtime
The container runtime is the software that is responsible for running containers. Kubernetes supports several runtimes: Docker, rkt, runc and any OCI runtime-spec implementation.
At the time of writing, Docker is the most popular container runtime. Therefore it will be used throughout this series.
kubelet
An agent that runs on each node in the cluster. It makes sure that containers are running in a pod.
The kubelet takes a set of PodSpecs that are provided through various mechanisms and ensures that the containers described in those PodSpecs are running and healthy. The kubelet doesn’t manage containers which were not created by Kubernetes.
PodSpecs are specifications of Kubernetes pods that you want created. If you’re interested in the details, they’re define using the “pod core” and “PodSpec core” APIs, among others. However, don’t worry if it doesn’t make sense to you now, we’ll delve into the Kubernetes APIs later.
Note: If you’re really keen to jump in, I suggest you look into spinning up pods using Deployments, Jobs and/or StatefulSets instead of spinning up pods directly. Again though, don’t worry if this doesn’t make sense to you, we’ll go through this all in future posts.
The above quote from the documentation is telling us that the API server sends instructions to kubelet. These instructions contain information (specifications) on pods which are to be spun up on the particular Node which is receiving the instructions.
Note that it is also kubelet’s responsibility to ensure that these pods are healthy.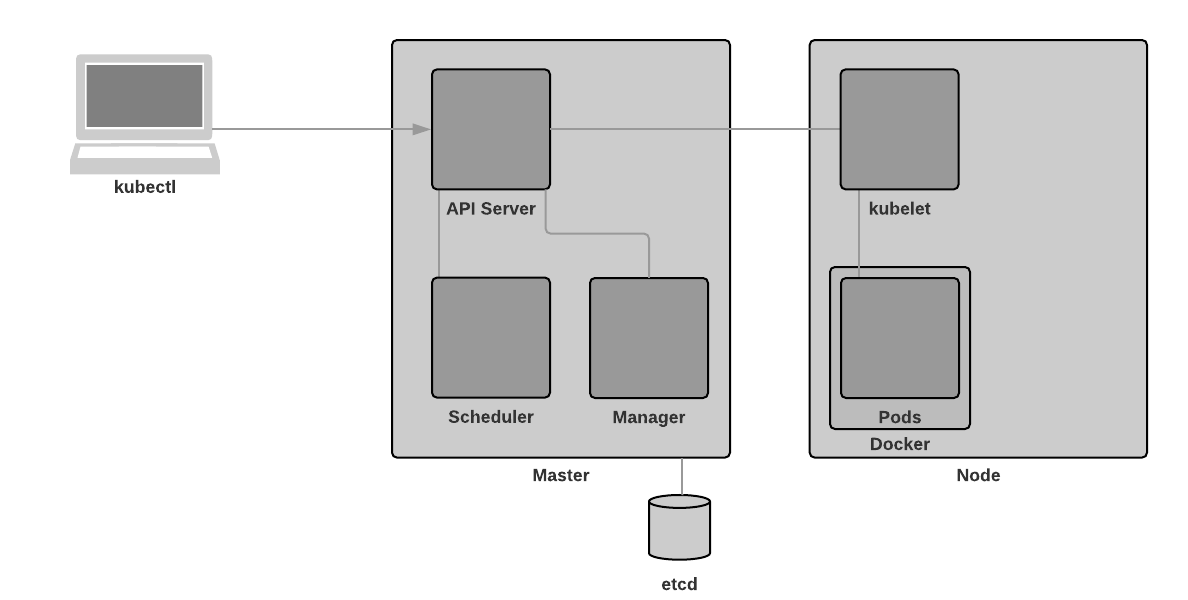
kube-proxy
kube-proxy enables the Kubernetes service abstraction by maintaining network rules on the host and performing connection forwarding.
In the DevOps: The Evolution of Applications post, it was mentioned that orchestrators such as Kubernetes “look at a container’s requirements and place them on a host which has enough resources to satisfy its needs”. And, as per the kube-scheduler section above, _“Component on the master that watches newly created pods that have no node assigned, and selects a node for them to run on.”_That’s great, but how do we find a pod when we don’t know which node it resides? We use services and kube-proxy. We’ll cover services in a later post and will focus on kube-proxy for now.
Using iptables, kube-proxy is able to forward connections between Nodes. In doing so, we can ensure that our traffic will always find the Node(s) which contain the pod(s) we’re looking for. An additional benefit of this connection forwarding is that it provides us with transparent and automated load balancing.
That’s right! No physical or virtual load balancers. No in-path deployments. No complex redirection rules or configuration. It is done completely transparently. We simply spin up two or more pods, and Kubernets handles the rest. That’s pretty neat, isn’t it?

Node Recap
- Nodes need a container runtime that is used to run the Kubernetes pods
- When
kubeletreceives a request to schedule pods, it does so within the container runtime - Incoming traffic is load balanced across Nodes using
kube-proxy
Master & Node communications
If you’re interested in how the communications work between Master(s) and Node(s), the aptly named Master-Node communication document is a great read.
As always, if you have any questions or have a topic that you would like me to discuss, please feel free to post a comment at the bottom of this blog entry, e-mail at will@oznetnerd.com, or drop me a message on Reddit (OzNetNerd).
Note: The opinions expressed in this blog are my own and not those of my employer.

Leave a comment